Blog
How to Remove an Iron-On Patch Without Damaging the Fabric
Knowing how to remove an iron-on patch cleanly is just as useful as knowing how to apply one. Maybe the design has changed, the patch is damaged, or you simply want to reposition it. Whatever the reason, the key principle is the same: heat softens the adhesive, and patience does the rest. In this step-by-step guide, we walk through how to remove an iron-on patch correctly, how to deal with adhesive residue, and what to expect from different fabric types.
What You Need to Remove an Iron-On Patch
- A clothes iron or heat gun — to soften the adhesive bond
- A thin pressing cloth — to protect the fabric surface during heating
- Tweezers or a butter knife — to lift the patch edge without scratching fabric
- Rubbing alcohol (isopropyl) or acetone — to remove adhesive residue
- A clean white cloth — to apply and blot the solvent
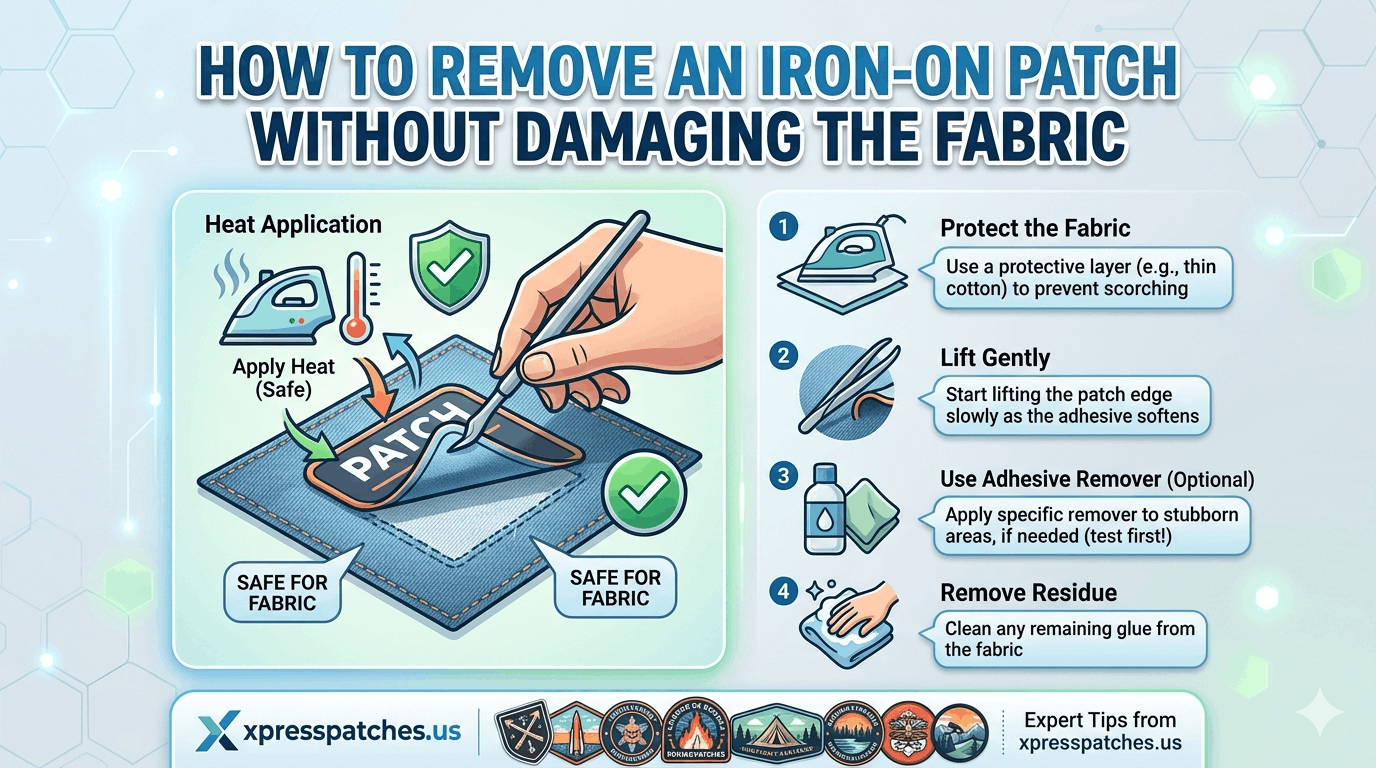
How to Remove an Iron-On Patch: 5 Steps
Step 1 — Heat the Patch
First, set your iron to medium-high heat with the steam function turned off. Lay a thin pressing cloth over the patch to protect the fabric and patch surface from direct heat. Press the iron firmly over the patch for 15–20 seconds. You do not need as much heat as when originally applying the patch — just enough to soften the adhesive bond so it becomes pliable rather than rigid.
A heat gun at medium temperature held 2–3 inches above the patch surface for 10–15 seconds also works well. As a result, the adhesive softens and the patch becomes easier to lift without tearing the fabric underneath.
Step 2 — Peel from a Corner While Still Warm
Immediately after heating, use tweezers or your fingernail to lift one corner of the patch. Work quickly while the adhesive is still warm and soft. Peel slowly at a low, flat angle — almost parallel to the fabric surface — rather than pulling straight up. Pulling at a low angle puts far less stress on the fabric fibres and greatly reduces the risk of tearing. Furthermore, peeling slowly rather than yanking gives the adhesive time to release cleanly.
Step 3 — Reheat Resistant Areas
Patches that have been correctly ironed on — especially those with edge stitching added after bonding — will need more heat and patience to remove. Work in small sections, heating 10–15 seconds at a time and peeling as you go. Moreover, patches on denim and thick cotton bond more strongly than those on lighter fabrics, so expect to repeat the heat-and-peel cycle several times on heavy garments. Never force a cold patch — cold adhesive is brittle and forcing it will tear the garment fabric.
Step 4 — Remove the Adhesive Residue
After the patch is off, you will almost always see some adhesive residue — a slightly shiny, waxy, or sticky area where the patch was bonded. To remove it:
- Dampen a clean white cloth with rubbing alcohol (isopropyl alcohol at 70% or higher)
- Gently rub the residue in small circular motions
- The adhesive will begin to lift and transfer to the cloth
- Use a fresh section of cloth and repeat until no more residue transfers
- Allow the area to dry fully before assessing whether any residue remains
According to Good Housekeeping’s fabric care guide, rubbing alcohol is safe for most cotton and denim fabrics when used carefully and in small amounts. If rubbing alcohol does not fully remove the residue, acetone (nail polish remover) is more powerful — however, always test acetone on a hidden area first as it can affect certain dyes and synthetic finishes.
Step 5 — Wash the Garment
After removing the residue, wash the garment as normal according to its care label. This removes any remaining solvent traces, lifts final adhesive residue, and restores the fabric’s natural feel. As a result, most garments look close to their original state after a full wash following patch removal.
What to Expect on Different Fabric Types
Cotton and Denim
Cotton and denim are the most forgiving fabrics for iron-on patch removal. The tight, durable weave withstands the heat and solvent needed without damage in most cases. Some slight colour change or fabric softening may occur at the bonding spot, but this typically fades after a few washes. Therefore, removing patches from cotton and denim is relatively low risk when done patiently with the correct method.
Polyester and Synthetic Blends
Synthetic fabrics are much riskier. Polyester fibres can distort or melt under the heat required to soften adhesive. Furthermore, acetone can dissolve certain synthetic dyes completely. If you must remove a patch from a synthetic garment, use the minimum heat possible and avoid solvents entirely — use a commercial fabric-safe adhesive remover instead.
Delicate Fabrics
For silk, wool, linen, and other delicate fabrics, removing an iron-on patch professionally by a dry cleaner is strongly recommended. The combination of heat and solvent needed for DIY removal carries a high risk of permanent damage to delicate fibres and dyes.
Will There Be a Mark After Removal?
In most cases, removing an iron-on patch from cotton or denim leaves at most a faint outline or slight colour difference — sometimes called “ghosting.” On dark fabrics, ghosting is rarely visible. On pale or white fabrics, a faint shadow may remain even after washing. The most effective solution is to place a new patch over the same area to cover any mark left behind. Therefore, if you are removing a patch to replace it with a new design, order your replacement patch at the same time so you can cover any mark immediately.
Preventing the Problem: When to Use Velcro Instead
If you know you might want to change or remove a patch in the future, the simplest solution is to order it with Velcro backing instead of iron-on. Velcro-backed patches peel off in seconds with no heat, no residue, and no fabric risk. They can be reapplied to a new garment or stored and reused indefinitely. At Xpress Patches, Velcro backing is available at no extra charge on every order. For more on backing choices, see our guide to iron-on vs sew-on vs Velcro patches.
Frequently Asked Questions — How to Remove an Iron-On Patch
How do you remove an iron-on patch?
Heat the patch with a medium-high iron for 15–20 seconds to soften the adhesive, then peel slowly from one corner while warm. Use rubbing alcohol on a cloth to remove residue. Never force a cold patch as this tears the fabric underneath.
Does removing an iron-on patch damage the fabric?
On cotton and denim, removal is usually clean with minimal marks. Some faint ghosting may remain on pale fabrics. Synthetic and delicate fabrics carry higher risk of damage — use minimum heat and always test solvents on a hidden area first.
What removes iron-on patch adhesive residue?
Rubbing alcohol (isopropyl alcohol) is the most effective household solution. Acetone works on stubborn residue but should be tested on a hidden area first. Commercial adhesive removers such as Goo Gone are also effective and gentler on most fabrics.
Can you remove an iron-on patch and reuse it?
Rarely. The adhesive backing is largely consumed during the initial bonding and usually cannot bond reliably again after removal. If you want a reusable patch, order it with Velcro backing instead — it peels off instantly with no damage and can be reapplied to any garment indefinitely.
Need a Replacement Patch?
If you have removed a damaged or outdated patch and need a fresh replacement, Xpress Patches makes it easy. No minimum order, free digital mock-up in 24 hours, and 14-day delivery. Choose from embroidered, PVC, woven, chenille, or printed patches — with iron-on, sew-on, or Velcro backing at no extra cost.